
Sticker Studio
Sticker Studio provides an automated workflow to convert reference images and ideas into die-cut vinyl stickers. The studio runs entirely on your local machine through Stable Diffusion WebUI Forge or ComfyUI.
Every generated sticker includes a clean, die-cut border and an alpha-transparent background ready for production or digital sharing.
Key Capabilities
- Local Engine Inference: Generate artwork through local Stable Diffusion Forge or ComfyUI instances.
- Curated Style Presets: Select from six specialized sticker art styles with pre-tuned prompt keywords.
- Auto-Cutout Isolation: Automatically detect and remove image backgrounds to isolate the primary subject.
- Die-Cut Contour Tuner: Adjust white contour border thickness from 0 px to 24 px in real time.
- Transparent Alpha Canvas: Inspect generated assets over an alternating high-contrast checkerboard grid.
- One-Click Export: Copy 32-bit transparent PNGs to your system clipboard or save files to disk.
Interface Layout: Dual-Stage Workspace
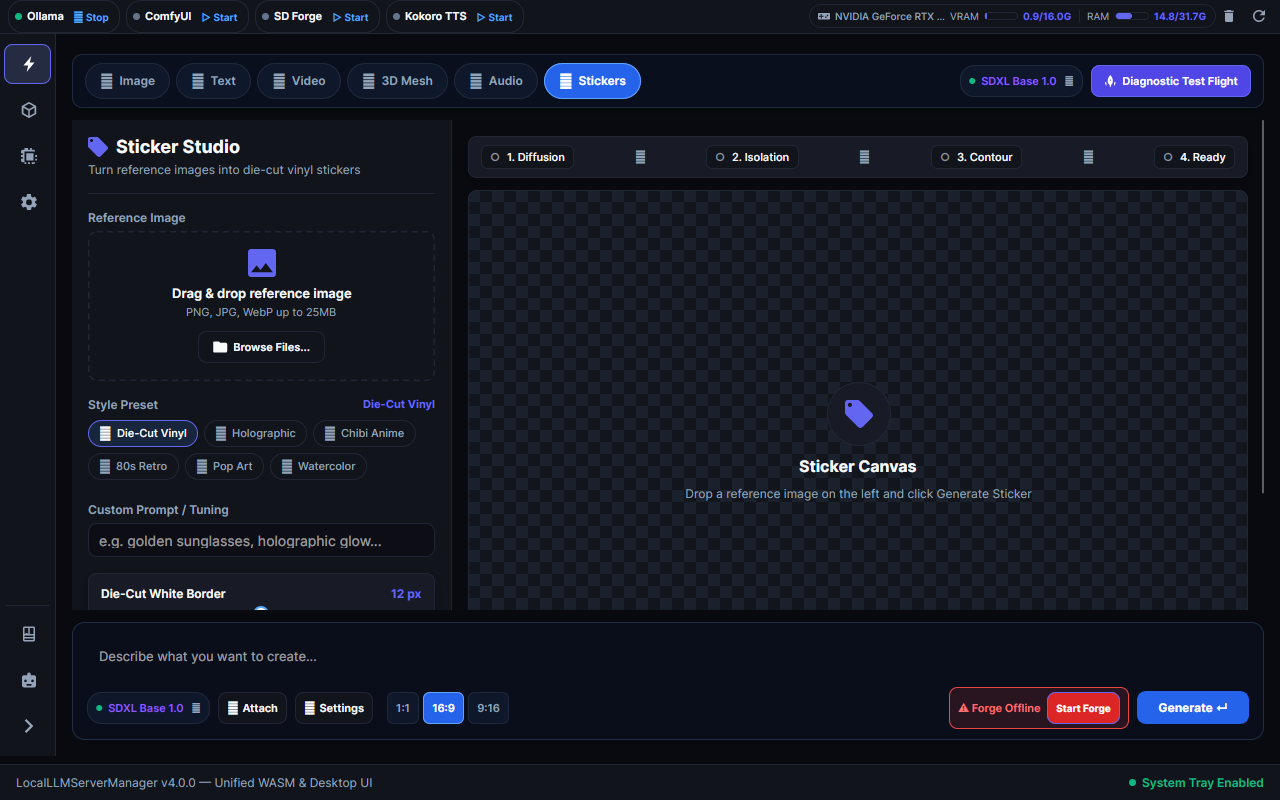
Sticker Studio uses a dynamic dual-stage canvas layout designed for creative focus:
1. Left Column: Input Deck (380 px)
The scrollable Input Deck contains all input controls:
- Reference Image Drop Zone: Drag and drop PNG, JPG, or WebP reference images up to 25 MB.
- Style Preset Chips: Select from six curated art styles to inject prompt keywords instantly.
- Prompt & Negative Prompt: Customize positive prompt descriptions and unwanted visual artifacts.
- Contour Settings: Toggle automated background cutout and adjust border width between 0 px and 24 px.
- Generate Sticker Button: Start local inference and watch the pipeline progress.
2. Right Column: Output Preview Canvas
The flexible output canvas displays your rendering results:
- Alpha Checkerboard Grid: High-contrast dark tiles (
#12161cand#1a202c) highlight edge transparency and white die-cut contours. - Generating Overlay: Displays indeterminate progress bars and stage status messages during generation.
- Export Action Pills: Quick-action buttons to copy transparent PNGs to the clipboard or save files to disk.
Curated Style Presets
Sticker Studio provides six curated art styles. Each preset injects specialized positive and negative tokens into your generation request:
| Preset Name | Icon | Default Border | Injected Positive Tokens | Injected Negative Tokens |
|---|---|---|---|---|
| Die-Cut Vinyl | 🏷️ | 12 px | bold white die-cut border, vector sticker, clean lineart, glossy finish, solid white background | photorealistic, noisy, blurry, gradient background, complex background, text, watermark |
| Holographic | 🌈 | 14 px | holographic foil sticker, iridescent rainbow sheen, metallic edge, prismatic reflections | matte, flat, dull colors, noisy background |
| Chibi Anime | 👾 | 12 px | chibi kawaii sticker, oversized head, bold clean lines, cel shaded, sticker cutout | realistic proportions, dark, gritty, sketchy, rough lines |
| 80s Retro | 📼 | 16 px | retro 80s synthwave sticker, neon cyan and magenta, halftone dots, badge contour | modern, minimalist, monochrome, muted colors |
| Pop Art | 🎨 | 12 px | pop art comic sticker, bold ink outlines, vibrant flat colors, dot pattern | soft shading, realism, muted, blurry |
| Watercolor | 🖌️ | 10 px | watercolor illustration sticker, soft pigment bleeding, crisp white border | harsh vector, digital CGI, photorealism, muddy colors |
TIP
You can append custom prompt terms while preserving preset tokens. The studio automatically combines your custom text with the selected preset tokens.
4-Stage Generation Pipeline
When you click Generate Sticker, the request executes across four automated stages:
- Stage 1: Diffusion Generation:
- Routes the prompt and parameters to your local Stable Diffusion Forge or ComfyUI backend.
- Renders the subject with high contrast against an isolated solid background.
- Stage 2: Subject Isolation:
- Removes background pixels automatically when Auto-Cutout is active.
- Produces a clean RGBA transparent mask of the primary subject.
- Stage 3: Contour Application:
- Dilates the subject alpha mask by the chosen border radius ($0\text{ to }24\text{ px}$).
- Applies a solid white die-cut contour band around the outer boundary.
- Stage 4: Ready:
- Renders the completed 32-bit transparent PNG onto the alpha checkerboard canvas.
- Activates the floating export action pills.
Step-by-Step Generation Procedure
Follow these steps to create a sticker:
Step 1: Verify Engine Status
- Check the Telemetry Ribbon in the titlebar.
- Confirm that Forge or ComfyUI shows an active green status dot.
- If the engine is offline, open the Engines view and start the service.
Step 2: Provide Input Reference or Prompt
- In the Input Deck, drag and drop an image into the Drop Zone, or click Browse Files.
- Alternatively, leave the drop zone empty and type a description into the Custom Prompt field.
Step 3: Select a Style Preset
- Click a style preset chip (for example, 🏷️ Die-Cut Vinyl or 🌈 Holographic).
- The studio loads the default border width and token settings for that style.
Step 4: Configure Contour Settings
- Verify that Auto-Cutout is checked.
- Adjust the Die-Cut Border Width slider between
0and24 px(default:12 px).- Set
0 pxfor borderless transparent cutouts. - Set
8–14 pxfor standard die-cut stickers. - Set
16–24 pxfor bold graphic badges.
- Set
Step 5: Generate and Export
- Click ✨ Generate Sticker.
- Watch the progress tracker during diffusion and contour processing.
- When generation completes, inspect the result on the checkerboard canvas.
- Click 📋 Copy PNG to copy the 32-bit transparent image to your clipboard.
- Click 💾 Save File to save the sticker to your
outputs/stickers/folder.
NOTE
Clipboard export writes a native 32-bit ARGB/PNG bitmap. You can paste the sticker directly into Discord, Slack, Photoshop, or office documents.
Hardware Fit & VRAM Guidelines
Sticker generation uses standard diffusion models. Review these memory guidelines for optimal performance:
| Checkpoint Family | Recommended Resolution | Minimum VRAM | Recommended Engine |
|---|---|---|---|
| SDXL Sticker Checkpoints | 1024 × 1024 | 8 GB | Stable Diffusion Forge |
| SD 1.5 Sticker Checkpoints | 512 × 512 | 4 GB | Stable Diffusion Forge |
| FLUX.1-schnell | 1024 × 1024 | 12 GB | ComfyUI / Forge |
IMPORTANT
The built-in VRAM Orchestrator automatically unloads inactive Ollama text models before sticker diffusion starts. This prevents out-of-memory errors on 8 GB and 12 GB GPUs.
Related Documentation
- Multimodal Studio Overview — Learn about studio architecture and modalities.
- Image Generation Guide — General diffusion settings and parameter tuning.
- LoRA Art Styles Guide — Download custom sticker LoRAs from CivitAI.
- Stable Diffusion Forge Engine — Configure your local Forge installation.
- ComfyUI Engine Guide — Manage ComfyUI workflows and custom nodes.